
OAuth Authentication
All 7shifts partners must authenticate using the OAuth 2.0 flow to use 7shifts API endpoints. This guide will outline how to implement this flow.
Requirements
If you are a new partner or don't have a 7shifts OAuth client, please reach out to [email protected] to start the setup process.
To expedite the OAuth client creation process please have this information ready:
- Technical email contact. Should be a valid email address not tied to a user
- First & last name of the primary technical contact
- The official name for your company. Used during authorization process.
- A PNG image of your company logo. Used during the authorization process.
- A callback url. Used to receive the company GUID after authorization granted.
Once 7shifts has created an OAuth client for you, a client ID & a client secret will be shared with you. You must ensure that these credentials are stored safely, they cannot be recovered as losing them would require resetting the OAuth client and having to re-authorize your application to already integrated customers.
The OAuth flow
Upon completion of this guide, you will have implemented the OAuth 2.0 client credentials flow, which allows your application to authenticate directly with the 7shifts API with minimal user interaction, only requiring an authorization grant.
7shifts uses OAuth 2.0's client credentials grant flow to issue access tokens for server-to-server authentication. The following diagram illustrates the OAuth flow based on the interactions between your application and the 7shifts authentication server.

Company grant process
For any mutual customers that wish to integrate your platform with 7shifts, a company administrator on their account will first need to allow access to their 7shifts company data for your OAuth client. This is usually completed by having the customer go to a certain URL that includes your OAuth client ID & allowing access to your OAuth client (also known as the 'Company Grant' flow).
The Authorization URL that the company administrator is redirected to on 7shifts is
https://app.7shifts.com/generate_token?client_id={CLIENT_ID}(Replace CLIENT_ID with your OAuth client ID).
It is highly recommended that you present this link to your customers on your platform's Integrations/Marketplace page.
To prevent CSRF attacks or to provide your own identifier during the generate company grant process our protocols support the state parameter. You can use this parameter to restore states to your application as it will be return back to your redirect url when a grant is created. The state parameter is a string that you can encode whatever information you need.
The Authorization URL with a state is
https://app.7shifts.com/generate_token?client_id={CLIENT_ID}&state={PARTNER_PROVIDED_STRING}Company grant flow for administrators
Once a 7shifts admin has been sent to the aforementioned URL for granting access to your OAuth client, the flow looks as follows:
- If the admin is not already logged into 7shifts, they are shown the login screen so that they can login to 7shifts:

- If the admin is an administrator for multiple companies/accounts, then they are asked to choose the company that they wish to grant your OAuth client access to:

- Once they are logged in (and if they are an admin on multiple companies, have chosen the right account), they will be able to see your company's logo and choose to grant access. The logo is provided to 7shifts at the time of OAuth client creation:

- Once the "Grant Access" button is clicked the grant GUID will be created. Depending on your OAuth client configuration there are two methods to obtain the GUID.
Option 1 Manual Process - No redirect URL configured
If you do not have a redirect URL configured on your OAuth client, the company will be shown a page with the GUID, which can be copied and provided back to you. It is recommended during testing to not setup a callback URL in your OAuth client in order to not have to setup a received handler for the GUID. Once you are ready to receive the GUID via the callback URL contact 7shift support to have it configured.

Option 2 Automated Process - Redirect URL configured
If you have a redirect URL configured on your OAuth client, upon pressing the "Grant Access" button the page will be redirected to your redirect URL. The GUID and COMPANY_ID will be included in the URL after the #:
https://redirect_url?guid={GUID}&company_id={COMPANY_ID}#guid={GUID}&company_id={COMPANY_ID}It is recommended that your server handle the redirect by providing a message indicating to the customer the process is complete, or navigating to additional configuration pages.
If you provided a state parameter it will be appended to the URL paramters
https://redirect_url?guid={GUID}&company_id={COMPANY_ID}&state={PARTNER_PROVIDED_STRING}#guid={GUID}&company_id={COMPANY_ID}- You can then use this unique grant (i.e., company GUID) to request an access token with the proper scopes to make API requests for that specific 7shifts company.
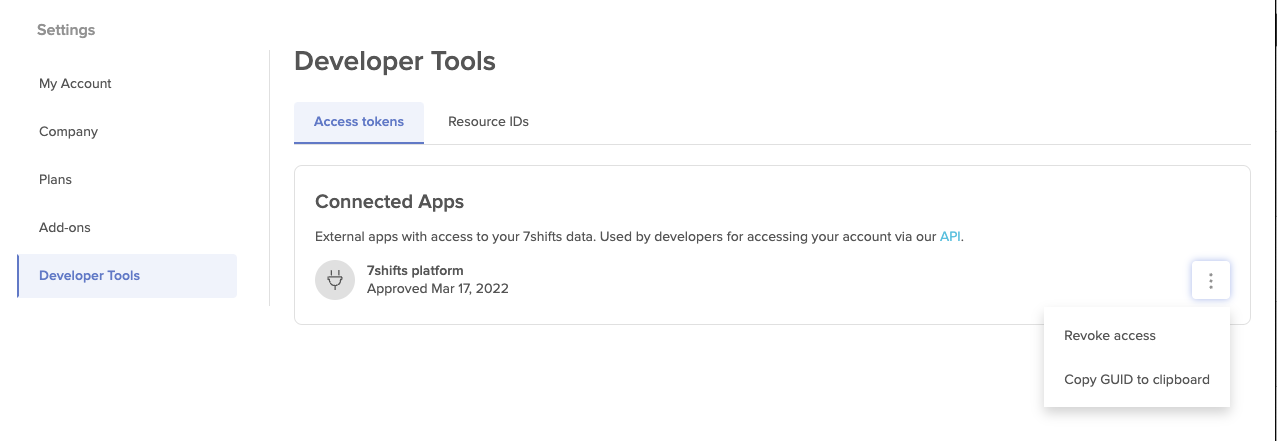
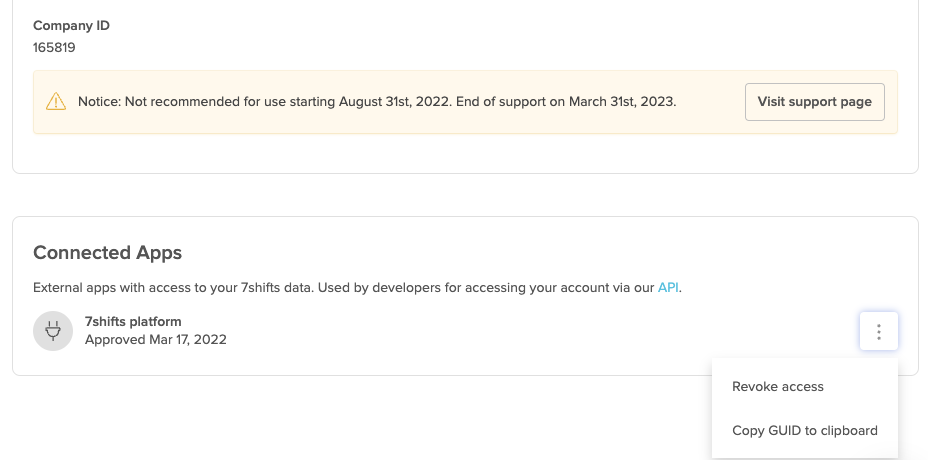
If you need manual access to the company GUID after it has been created, a company admin is able to copy it by navigating to "Company Settings", "Developer Tools" --> "Connected Apps" section. Under the listed app menu, the click the "Copy the GUID to the clipboard" action.
Creating a token
To make requests against an API a bearer token must be issued that can be used for API calls. The token request requires a scope, the client id, and the client secret. Bearer tokens expire after 1 hour. Only request the scopes you intend to use.
curl --request POST --url 'https://app.7shifts.com/oauth2/token' \
--header 'Content-Type: application/x-www-form-urlencoded' \
--data-urlencode 'grant_type=client_credentials' \
--data-urlencode 'client_id={CLIENT_ID}' \
--data-urlencode 'client_secret={CLIENT_SECRET}' \
--data-urlencode 'scope=v1_access {ADDITIONAL_SCOPES}'| Scopes | Notes |
|---|---|
| companies:read companies:write | Reading or mutating company object |
| departments:read departments:write | Reading or mutating departments |
| locations:read locations:write | Reading or mutating locations |
| roles:read roles:write | Reading or mutating roles |
| users:read users:write | Reading or mutating users |
| sales:read sales:write | Reading or mutating sales |
| shifts:read shifts:write | Reading or mutating shifts and schedule publishing |
| time_punches:read time_punches:write | Reading or mutating time punches |
| events:read events:write | Reading or mutating schedule events |
Making API requests
Once a bearer token has been issued it can be used to make API requests.
All requests require two headers to be sent along. The Authorization Bearer header, with the token issued from the previous token request. And an x-company-guid header. This GUID ensures the request is being made for one specific company.
The GUID is issued to a partner when a company grant is authorized by an administrator of the account. The GUID is a 1:1 map to each company ID.
To confirm your access token is valid you can use the test endpoint <https://api.7shifts.com/v2/whoami>. If successful it will return an identify_id in the payload.
curl --request --url GET 'https://api.7shifts.com/v2/whoami' \
--header 'x-company-guid: {GUID}' \
--header 'Authorization: Bearer {ISSUED_TOKEN}'
Once you have verified your OAuth authentication you may start making API calls.
url --request GET --url 'https://api.7shifts.com/v2/companies' \
--header 'x-company-guid: {GUID}' \
--header 'Authorization: Bearer {ISSUED_TOKEN}'
Refreshing a token
Tokens expire after 1 hour from creation. After they expire you will need to create a new one using the create token process. A refresh token mechanism will be added in the future.
Revoking Grants Notifications
A company administrator may disable your integration by revoking a grant. This can be done by navigating to "Company Settings", then "Developer Tools" and revoking any Connected Apps.
If you wish to be notified when a company grant is revoked you can subscribe to the authorization.revoked webhook. This way you can know immediately when an integration to a company is no longer active and and stop making requests on behalf of that company.
Updated about 1 year ago